Explain Singleton Pattern in iOS

· 3 min read
Szymon Michalak
iOS Developer
Sources & Resources

Main Source: Ray Wenderlich - Design Patterns by Tutorials (2019)

Further Reading:

TL/DR

The Singleton Pattern restricts a class to a single instance and provides a global point of access to that instance. It is often used in iOS for managing shared resources or ensuring consistency throughout the app.

Concept Overview

The Singleton Pattern ensures that a class has only one instance, providing a global access point to that instance. It’s used frequently in iOS for things like app settings, managing global states, and coordinating shared resources. This pattern comes in two forms:

  • Singleton: Only a single instance of the class exists.
  • Singleton Plus: There’s a shared instance, but additional instances can be created if needed.

How Singleton Works:

  1. Private Constructor: The constructor is private to prevent direct instantiation.
  2. Shared Instance: A static property provides access to the single instance.
  3. Lazy Instantiation: The instance is only created when it is first accessed.

Key Benefits:

  • Global Access: Provides a shared instance that can be accessed from anywhere in the app.
  • Consistency: Ensures that only one instance of a class exists, which is important for managing shared resources or states.

Playground Example

Here’s an example of using the Singleton Pattern in an iOS app:

import Foundation

// MARK: - Singleton
public class AppSettings {
// Static shared instance
public static let shared = AppSettings()

// Private initializer to prevent additional instances
private init() { }

// Example properties
public var theme: String = "Light"
public var language: String = "English"
}

// Usage
let settings = AppSettings.shared
settings.theme = "Dark"
print("App theme is: \(settings.theme)")

How It Works:

  • Private Constructor: AppSettings uses a private initializer to prevent creating multiple instances.
  • Shared Access: The static shared instance allows global access to the settings.

When to Use

  • Shared Resources: Use the Singleton Pattern when you need to manage shared resources (e.g., settings, cache) across the entire app.
  • Global State: When you need to enforce consistency, ensuring only one instance of the class is active.

When to Be Careful

  • Overuse: Singletons can introduce hidden dependencies and make unit testing difficult due to the global state they create.
  • Testing Challenges: Mocking or replacing singletons in tests can be tricky, as they often introduce tightly coupled dependencies.

In Bullets
  • Singleton Pattern restricts a class to one instance and provides a global access point.
  • It is used for shared resources and global states in iOS apps.
  • Be cautious of overuse and the potential impact on unit testing.

Explain the State Pattern in iOS

· 3 min read
Szymon Michalak
iOS Developer
Sources & Resources

Main Source: Ray Wenderlich - Design Patterns by Tutorials (2019)
Further Reading:

TL/DR

The State Pattern allows an object to change its behavior based on its current state. It helps to avoid large switch or if-else statements and promotes better organization of state-based logic. This pattern is useful in systems that have multiple states, such as animations, game mechanics, or UI changes.

Concept Overview

The State Pattern consists of three primary components:

  1. Context: The object that holds the current state and delegates behavior to the current state.
  2. State Protocol: Defines the required methods and properties for states.
  3. Concrete States: Implement the behavior associated with a particular state.

In iOS, the State Pattern can be used to handle various states of an object, such as a traffic light system or the different stages of an animation.

How State Works:

  1. Context: Maintains a reference to the current state.
  2. Concrete States: Each state implements different behavior that the context delegates to.
  3. State Protocol: Ensures all states have the required methods.

Key Benefits:

  • Encapsulation: The logic for each state is separated into different classes, promoting better organization.
  • Flexibility: Adding new states or modifying behavior becomes easier without changing the context class itself.

Playground Example

Here is an example of using the State Pattern to implement a traffic light system:

import Foundation

// MARK: - State Protocol
public protocol TrafficLightState {
func handle(context: TrafficLight)
}

// MARK: - Concrete States
public class GreenState: TrafficLightState {
public func handle(context: TrafficLight) {
print("Green Light - Cars can go.")
context.transition(to: YellowState())
}
}

public class YellowState: TrafficLightState {
public func handle(context: TrafficLight) {
print("Yellow Light - Cars should prepare to stop.")
context.transition(to: RedState())
}
}

public class RedState: TrafficLightState {
public func handle(context: TrafficLight) {
print("Red Light - Cars must stop.")
context.transition(to: GreenState())
}
}

// MARK: - Context
public class TrafficLight {
private var state: TrafficLightState

public init(initialState: TrafficLightState) {
self.state = initialState
}

public func request() {
state.handle(context: self)
}

public func transition(to newState: TrafficLightState) {
self.state = newState
}
}

// Example usage
let trafficLight = TrafficLight(initialState: GreenState())
trafficLight.request() // Green -> Yellow
trafficLight.request() // Yellow -> Red
trafficLight.request() // Red -> Green

How It Works:

  • Context: The TrafficLight class maintains a reference to the current state and delegates behavior to it.
  • State Transition: Each concrete state (such as GreenState) defines what the next state should be and transitions the context to it.
  • State Protocol: Ensures all states implement the handle() method.

When to Use

  • State-Based Behavior: When an object’s behavior depends on its current state and needs to change dynamically.
  • Avoiding Large Conditionals: If your code relies on many switch or if-else statements based on state, the State Pattern can provide a cleaner solution.

When to Be Careful

  • Overhead: Be cautious if the number of states is small and the logic is simple, as introducing the State Pattern may introduce unnecessary complexity.

In Bullets
  • The State Pattern allows objects to change behavior based on their state.
  • Components include context, state protocol, and concrete states.
  • Useful for systems with state-based logic such as traffic lights, animations, or game mechanics.

Explain Strategy Pattern in iOS

· 4 min read
Szymon Michalak
iOS Developer
Sources & Resources

Main Source: Ray Wenderlich - Design Patterns by Tutorials (2019)

Further Reading:

TL/DR

The Strategy Pattern defines a family of interchangeable algorithms that can be selected at runtime. The pattern allows for different behaviors (strategies) to be chosen and swapped without changing the overall structure of the object using the strategy.

Concept Overview

The Strategy Pattern consists of three key parts:

  • Context: The object that utilizes a strategy to perform a task.
  • Strategy Protocol: Defines a set of methods that any strategy must implement.
  • Concrete Strategies: Specific implementations of the strategy protocol that contain the actual algorithm or behavior.

The Strategy Pattern is commonly used when you need interchangeable behavior in your application without hard-coding decision logic into the context object. It allows you to select and switch between different strategies dynamically at runtime.

How Strategy Works:

  1. Context Object: The context holds a reference to a strategy object and delegates behavior to it.
  2. Concrete Strategies: These classes implement the strategy protocol with specific behaviors.
  3. Interchangeability: Strategies can be swapped at runtime, making the behavior of the context flexible.

Key Benefits:

  • Open/Closed Principle: New strategies can be added without modifying the existing codebase.
  • Separation of Concerns: Each strategy focuses on a specific task, leading to cleaner code.
  • Reusability: Strategies can be reused in different contexts.

Playground Example

Here’s an example demonstrating the Strategy Pattern in an app that uses various movie rating services:

import UIKit

// Strategy Protocol
public protocol MovieRatingStrategy {
var ratingServiceName: String { get }
func fetchRating(for movieTitle: String, success: (_ rating: String, _ review: String) -> ())
}

// Concrete Strategy 1: Rotten Tomatoes
public class RottenTomatoesClient: MovieRatingStrategy {
public let ratingServiceName = "Rotten Tomatoes"

public func fetchRating(for movieTitle: String, success: (_ rating: String, _ review: String) -> ()) {
// Dummy response for demonstration purposes
let rating = "95%"
let review = "It rocked!"
success(rating, review)
}
}

// Concrete Strategy 2: IMDb
public class IMDbClient: MovieRatingStrategy {
public let ratingServiceName = "IMDb"

public func fetchRating(for movieTitle: String, success: (_ rating: String, _ review: String) -> ()) {
// Dummy response for demonstration purposes
let rating = "8.7"
let review = "A masterpiece!"
success(rating, review)
}
}

// Context
public class MovieRatingService {
private var strategy: MovieRatingStrategy

init(strategy: MovieRatingStrategy) {
self.strategy = strategy
}

func changeStrategy(_ strategy: MovieRatingStrategy) {
self.strategy = strategy
}

func fetchRating(for movieTitle: String) {
print("Fetching rating from \(strategy.ratingServiceName)")
strategy.fetchRating(for: movieTitle) { (rating, review) in
print("Rating: \(rating), Review: \(review)")
}
}
}

// Usage
let movieService = MovieRatingService(strategy: RottenTomatoesClient())
movieService.fetchRating(for: "Inception")

movieService.changeStrategy(IMDbClient())
movieService.fetchRating(for: "Inception")

How It Works:

  • Strategy Protocol: MovieRatingStrategy defines the structure all strategies must follow.
  • Concrete Strategies: RottenTomatoesClient and IMDbClient implement the protocol with their respective algorithms.
  • Context: The MovieRatingService uses the strategy pattern to fetch movie ratings. The strategies can be swapped dynamically.

When to Use

  • Multiple Behaviors: When an object needs to exhibit multiple behaviors or use different algorithms, and these should be interchangeable.
  • Avoiding Conditional Logic: Instead of hard-coding different behaviors using complex conditionals, the strategy pattern allows for cleaner and more maintainable code by delegating the behavior to separate classes.

When to Be Careful

  • Overhead: If overused, the strategy pattern can introduce overhead with too many classes.
  • Complex Strategy Selection: You still need a mechanism to decide which strategy to use, which can sometimes be complex.

In Bullets
  • Strategy Pattern allows interchangeable behaviors (strategies) at runtime.
  • Context holds a reference to a strategy and delegates behavior to it.
  • The pattern promotes the Open/Closed Principle by allowing new strategies without modifying existing code.

Explain the Coordinator Pattern and Its Benefits

· 2 min read
Szymon Michalak
iOS Developer
Sources & Resources
TL/DR

The Coordinator pattern is a design pattern in iOS development that helps manage navigation flow and dependency between view controllers, leading to better-organized, more modular, and testable code.

The Coordinator pattern is an architectural pattern used in iOS development to manage the flow of navigation within an application. Instead of letting view controllers handle the navigation, a separate coordinator object takes over this responsibility. This leads to a more organized structure where view controllers are only responsible for displaying content, and the coordinator handles the logic of navigating between screens.

Code Examples

Here's a basic example of implementing the Coordinator pattern in Swift:

protocol Coordinator {
var childCoordinators: [Coordinator] { get set }
func start()
}

class MainCoordinator: Coordinator {
var childCoordinators = [Coordinator]()
var navigationController: UINavigationController

init(navigationController: UINavigationController) {
self.navigationController = navigationController
}

func start() {
let vc = ViewController()
vc.coordinator = self
navigationController.pushViewController(vc, animated: true)
}

func showDetail() {
let detailVC = DetailViewController()
detailVC.coordinator = self
navigationController.pushViewController(detailVC, animated: true)
}
}

In this example, MainCoordinator is responsible for initializing the first view controller and handling the navigation logic for showing a detail view controller.

Real-World Applications

The Coordinator pattern is particularly beneficial in large-scale applications where complex navigation flows exist. By separating the navigation logic from view controllers, the code becomes easier to manage, test, and maintain. It also promotes reusability, as the same coordinator can handle similar navigation flows across different parts of the app.

Common Mistakes

  • Tight Coupling: One common mistake when implementing the Coordinator pattern is allowing coordinators to become tightly coupled with specific view controllers, reducing flexibility.
  • Overcomplication: Sometimes, developers overcomplicate the Coordinator pattern by creating too many coordinators for simple flows, leading to unnecessary complexity.
In Bullets
  • Decouples Navigation from View Controllers: By moving navigation logic out of view controllers, the Coordinator pattern promotes cleaner and more modular code.
  • Improves Testability: Coordinators can be easily tested in isolation, leading to better test coverage for navigation logic.
  • Enhances Reusability: Coordinators can be reused across different parts of an application, especially in complex flows.

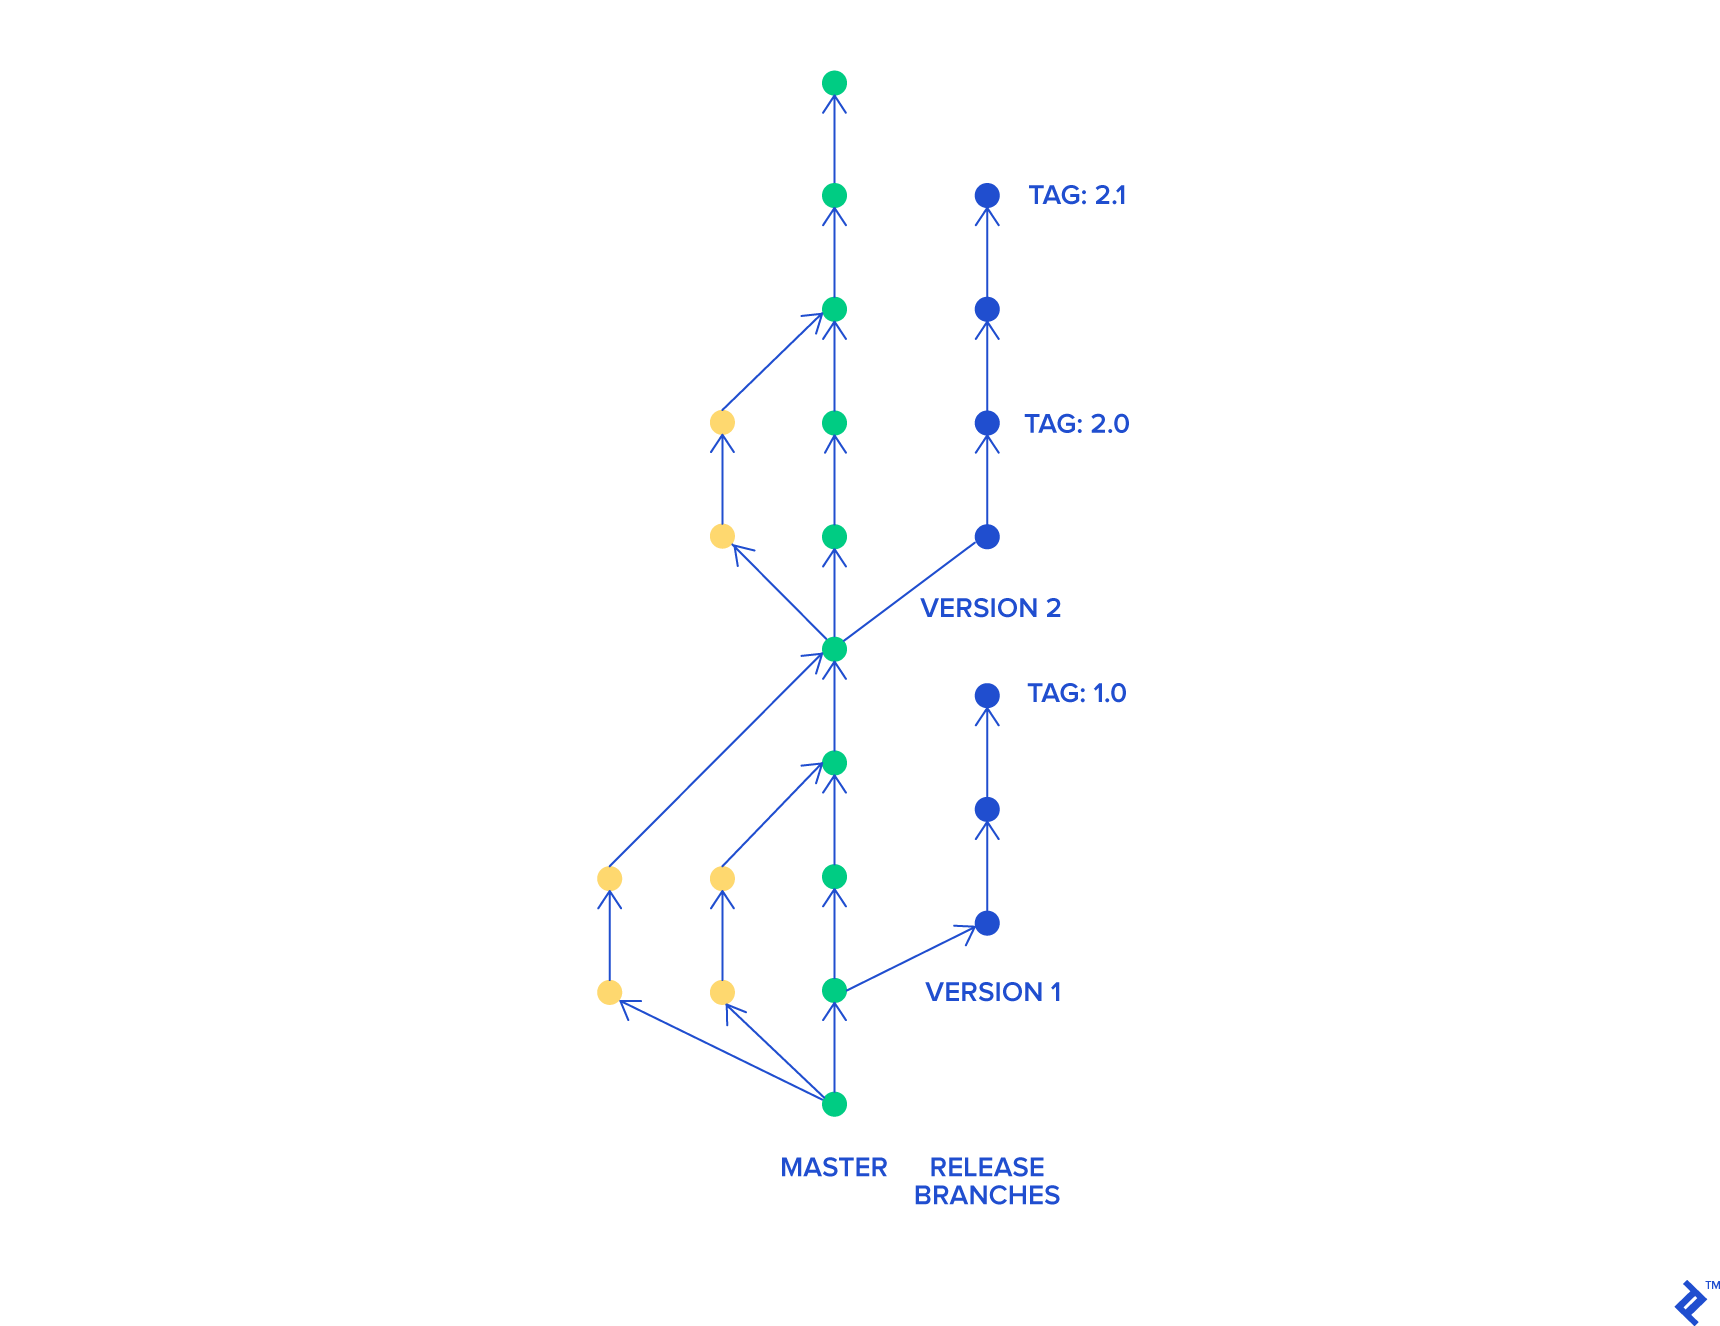
Git Flow vs. Trunk-Based Development

· 2 min read
Szymon Michalak
iOS Developer
Sources & Resources

Main Source: 🔗 Git Flow

Additional Sources:

Further Reading:

TL/DR

Git Flow and trunk-based development are two version control strategies with distinct advantages. Git Flow emphasizes structured branching and code reviews, making it ideal for open-source projects or teams with junior developers. Trunk-based development, on the other hand, focuses on continuous integration and rapid deployment, which suits startups and teams with experienced developers.

Concept Overview

Version control systems are crucial in software development, enabling teams to track changes, collaborate efficiently, and manage project history. Among the various strategies, Git Flow and trunk-based development are widely used but differ in approach and application.

  • Git Flow:
    • Involves creating feature branches off a develop branch.
    • Changes are merged back through pull requests, ensuring code quality through peer reviews.
    • It’s particularly useful in environments where code quality and control are prioritized over development speed.
  • Trunk-Based Development:
    • Developers work directly on a single branch, often the master.
    • Encourages continuous integration and short-lived feature branches.
    • Suited for fast-paced environments where rapid iteration and deployment are crucial.

Real-World Applications

  • Git Flow is ideal for large projects with a lot of contributors, such as open-source projects, where it’s essential to have controlled and well-reviewed code integration.

  • Trunk-based development works best in startup environments or in teams composed of senior developers who can be trusted to push directly to production, ensuring faster delivery without the bottlenecks of pull requests.

Common Mistakes

  • Git Flow: Overly complex branch structures can lead to difficult merges and integration challenges, especially in fast-moving projects.

  • Trunk-based Development: Without rigorous testing and discipline, it can lead to unstable builds being pushed to production.

Diagrams/Visual Aids

  • Git Flow: Git Flow Diagram

  • Trunk-Based Development: Trunk-Based Development Diagram

In Bullets
  • Git Flow: Best for environments needing strict code reviews and controlled integration.
  • Trunk-based Development: Suited for fast-paced, continuous integration environments.
  • Critical Decision Factor: Choose based on the project's need for speed vs. control.

Explain Model-View-Controller (MVC) Pattern in iOS

· 5 min read
Szymon Michalak
iOS Developer
Sources & Resources

Main Source: Ray Wenderlich - Design Patterns by Tutorials (2019)

Further Reading:

TL/DR

The Model-View-Controller (MVC) pattern is a fundamental design pattern in iOS development that separates an app into three components:

  • Model: Handles the data and business logic.
  • View: Manages the UI elements.
  • Controller: Acts as the mediator between the Model and View, updating both as needed.

The Model-View-Controller (MVC) design pattern is a widely used architectural pattern in software development, particularly in iOS. It divides an application into three main components:

  • Model: Represents the data and the business logic of the application. The model is responsible for managing the data, whether it's from a database, API, or other sources. It is independent of the user interface.

  • View: The view is responsible for displaying the user interface and presenting data to the user. It observes the model for changes and updates the UI accordingly. In iOS, views are typically represented by UIView or UIViewController objects.

  • Controller: The controller acts as an intermediary between the model and the view. It handles user input, updates the model, and refreshes the view. Controllers in iOS are commonly represented by UIViewController classes.

How MVC Works:

  1. User Interaction: The user interacts with the app through the view (e.g., tapping a button).
  2. Controller Handling: The controller captures this interaction and processes the input.
  3. Model Update: The controller updates the model based on the interaction.
  4. View Refresh: The view observes changes in the model and updates the UI accordingly.

Key Benefits:

  • Separation of Concerns: Each component has a distinct responsibility, making the code easier to maintain and extend.
  • Reusability: Components can be reused across different parts of the application or in other projects.
  • Testability: With the logic separated, individual components can be tested independently.

Playground Example

Here is a fully functional playground example demonstrating the MVC pattern in an address form application.

import UIKit

// MARK: - Address Model
public struct Address {
public var street: String
public var city: String
public var state: String
public var zipCode: String
}

// MARK: - Address View
public final class AddressView: UIView {
@IBOutlet public var streetTextField: UITextField!
@IBOutlet public var cityTextField: UITextField!
@IBOutlet public var stateTextField: UITextField!
@IBOutlet public var zipCodeTextField: UITextField!
}

// MARK: - Address View Controller
public final class AddressViewController: UIViewController {

// MARK: - Properties
public var address: Address?
public var addressView: AddressView! {
guard isViewLoaded else { return nil }
return (view as! AddressView)
}

// MARK: - View Lifecycle
public override func viewDidLoad() {
super.viewDidLoad()
updateViewFromAddress()
}

// MARK: - Helpers
private func updateViewFromAddress() {
guard let address = address else { return }
addressView.streetTextField.text = address.street
addressView.cityTextField.text = address.city
addressView.stateTextField.text = address.state
addressView.zipCodeTextField.text = address.zipCode
}

@IBAction public func updateAddressFromView(_ sender: AnyObject) {
guard
let street = addressView.streetTextField.text, street.count > 0,
let city = addressView.cityTextField.text, city.count > 0,
let state = addressView.stateTextField.text, state.count > 0,
let zipCode = addressView.zipCodeTextField.text, zipCode.count > 0
else {
// TODO: show an error message, handle the error, etc.
return
}

address = Address(street: street, city: city, state: state, zipCode: zipCode)
}
}

How It Works

  • Model: The Address struct stores address information like street, city, state, and zip code.
  • View: The AddressView contains UITextField outlets that correspond to the address fields.
  • Controller: The AddressViewController manages the interaction between the model and the view. It updates the view when the model changes, and when the user inputs data, it updates the model accordingly.

When to Use

  • Starting Point: MVC is an excellent starting pattern for structuring iOS applications. It provides a clear division of responsibilities that make apps more maintainable.
  • Simple Applications: This pattern works well for smaller projects or apps with simple user interfaces.
  • Reusability of Models and Views: If you need to reuse certain models and views across multiple parts of your app, MVC allows for that by decoupling the business logic from the UI.

When to Be Careful

  • Massive View Controller (MVC): In larger applications, it's common for view controllers to become bloated with too much logic, which can make the app harder to maintain. This is often referred to as "Massive View Controller".
  • Not Always Flexible: MVC works well for simpler applications, but when apps grow in complexity, other patterns like MVVM (Model-View-ViewModel) or Coordinator can be added to keep logic from overloading the controllers.
In Bullets
  • MVC separates an application into Model, View, and Controller components.
  • The Model holds the data, the View manages the UI, and the Controller acts as the intermediary between them.
  • Overloading the Controller can lead to "Massive View Controller" syndrome, where the controller becomes difficult to manage.

How can we handle changes in our application’s lifecycle state? (SwiftUI)

· 3 min read
Szymon Michalak
iOS Developer
Sources & Resources
TL/DR

In SwiftUI, you manage the application’s lifecycle using the @Environment(\.scenePhase) property, along with onAppear and onDisappear modifiers. The scenePhase property allows you to monitor and respond to changes in the app's lifecycle state.

SwiftUI introduces a declarative way to manage an application's lifecycle without relying on the traditional AppDelegate. Instead, you use the App protocol and the scenePhase environment property to track and respond to changes in the app's state.

Here are the key components:

  • @Environment(\.scenePhase): Provides access to the current lifecycle state of the app, which can be .active, .inactive, or .background.

  • onAppear(perform:): This modifier is used to run code when a view appears on the screen.

  • onDisappear(perform:): This modifier allows you to execute code when a view disappears from the screen.

  • App Lifecycle States:

    • .active: The app is currently active and in the foreground.
    • .inactive: The app is transitioning or is temporarily in an inactive state.
    • .background: The app is running in the background.

Example SwiftUI Code

import SwiftUI

@main
struct MyApp: App {
@Environment(\.scenePhase) var scenePhase

var body: some Scene {
WindowGroup {
ContentView()
.onAppear {
// Handle view appearance
}
.onDisappear {
// Handle view disappearance
}
}
.onChange(of: scenePhase) { newPhase in
switch newPhase {
case .active:
// The app is active
print("App is active")
case .inactive:
// The app is inactive
print("App is inactive")
case .background:
// The app is in the background
print("App is in the background")
@unknown default:
// Handle unexpected new phases
break
}
}
}
}

Additional Details

SwiftUI’s declarative lifecycle management allows for a more integrated approach to handling the state of your app, removing the need for a separate AppDelegate in most cases. However, you can still integrate an AppDelegate if needed, using the UIApplicationDelegateAdaptor property wrapper to bridge between UIKit and SwiftUI.

In Bullets
  • Lifecycle Management: In SwiftUI, use the @Environment(\.scenePhase) property to track app state changes.
  • Declarative Modifiers: Use onAppear and onDisappear to manage view-specific lifecycle events.
  • Integrated Handling: Most lifecycle management can be handled within the SwiftUI App protocol, reducing the need for an AppDelegate.
  • State Monitoring: The scenePhase provides a straightforward way to monitor .active, .inactive, and .background states.

How can we handle changes in our application’s lifecycle state? (UIKit)

· 3 min read
Ace the iOS Interview
Aryaman Sharda
Sources & Resources
TL/DR

Our application's AppDelegate allows us to handle its lifecycle changes. UIApplication triggers various delegate methods whenever the app's lifecycle status changes.

When building an iOS application, managing its lifecycle is crucial to ensure it behaves correctly during different states such as launching, becoming active, entering the background, and terminating. The UIApplicationDelegate provides several methods to handle these transitions:

  • application(_:willFinishLaunchingWithOptions:): Called when the app is about to launch. This is the app's first opportunity to execute code.

  • application(_:didFinishLaunchingWithOptions:): Called after the app has finished launching and is ready to run. Final initialization tasks should be performed here.

  • applicationDidBecomeActive(_:): Invoked when the app is about to become the foreground app. This is where last-minute preparations can be done.

  • applicationWillResignActive(_:): Notifies that the app is transitioning away from being the foreground app.

  • applicationDidEnterBackground(_:): Indicates that the app is now running in the background and may transition to a suspended state.

  • applicationWillEnterForeground(_:): Indicates that the app is transitioning from the background to the foreground but is not yet active.

  • applicationWillTerminate(_:): Notifies that the app is about to be terminated, providing a chance to perform any necessary cleanup.

These methods allow developers to effectively manage the app's behavior and resources at each stage of its lifecycle.

// Example Swift code
class AppDelegate: UIResponder, UIApplicationDelegate {

func application(_ application: UIApplication, willFinishLaunchingWithOptions launchOptions: [UIApplication.LaunchOptionsKey: Any]? = nil) -> Bool {
// First chance to execute code
return true
}

func application(_ application: UIApplication, didFinishLaunchingWithOptions launchOptions: [UIApplication.LaunchOptionsKey: Any]? = nil) -> Bool {
// Final initialization before the app is displayed
return true
}

func applicationDidBecomeActive(_ application: UIApplication) {
// App is becoming the foreground app
}

func applicationWillResignActive(_ application: UIApplication) {
// App is transitioning away from the foreground
}

func applicationDidEnterBackground(_ application: UIApplication) {
// App is now in the background
}

func applicationWillEnterForeground(_ application: UIApplication) {
// App is transitioning to the foreground
}

func applicationWillTerminate(_ application: UIApplication) {
// App is about to be terminated
}
}

Additional Details

Understanding the importance of these lifecycle methods is crucial for managing resources effectively, ensuring a smooth user experience, and handling tasks such as saving data or releasing resources when the app is not active.

In Bullets
  • Lifecycle Management: Use UIApplicationDelegate methods to manage app behavior during different lifecycle stages.
  • Initialization: Perform initial setup in application(_:willFinishLaunchingWithOptions:) and application(_:didFinishLaunchingWithOptions:).
  • State Transitions: Respond to app state changes using applicationDidBecomeActive(_:), applicationWillResignActive(_:), applicationDidEnterBackground(_:), and applicationWillEnterForeground(_:).
  • Termination: Clean up resources in applicationWillTerminate(_:).

💡 About Interview Questions

· One min read

The iOSwift.dev blog is a comprehensive resource featuring a wide range of questions and answers on various iOS development topics. From basic Swift concepts to advanced practices, this section provides valuable insights for developers at all levels. The blog entries are organized to help you quickly find the information you need to enhance your coding skills.

  • Search: Utilize the search function to find specific topics or questions.
  • Categories: Browse through categories to explore related questions and answers.
  • Tags: Use tags to discover related content and deepen your understanding of specific areas in iOS development.

Topics Covered

  • Swift Programming
  • iOS Frameworks
  • Design Patterns
  • App Architecture
  • Performance Optimization
  • UI/UX Best Practices
  • And more...

Stay Updated

New entries are regularly added to ensure that you stay informed about the latest trends and practices in iOS development. Check back frequently for fresh content.

Are closures value or reference types?

· 2 min read
Ace the iOS Interview
Aryaman Sharda
Sources & Resources
TL/DR

Closures are reference types.

When we use closures, we want them to be able to reference all of the variables from their surrounding context (like class and local variables). This means when the closure modifies acaptured reference-type variable in its definition, we’re also affecting the variable’s value outside of the closure's scope.

var money = Money(value: 20 , currencyCode: "USD")

//Output: Money(value: 20, currencyCode: "USD")
print(money)

let closure = {
money = Money(value: 200 , currencyCode: "USD")
}

closure()

//Output: Money(value: 200, currencyCode: "USD")
print(money)

If closures were value types, then they would only have access to a copy of the variables in their surrounding context instead of a direct reference to the variables themselves. So, if the value of any of these referenced variables changed, the closure would be none the wiser and would be operating on the now out-of-date values.

Sometimes, we’ll want this behavior though.

We can specify a capture list in our closure’s definition which will create an immutable read-only copy of the variables we’ve listed. This way, changes made within the closure’s definition will not affect the value of the variables outside of the closure.

var money = Money(value: 20 , currencyCode: "USD")

//Output: Money(value: 20, currencyCode: "USD")
print(money)

let closure = { [money] in
print(money)
}

money = Money(value: 200 , currencyCode: "USD")

//Output: Money(value: 20, currencyCode: "USD")
closure()

//Output: Money(value: 200, currencyCode: "USD")
print(money)

In this example, even though we’re modifying the money variable before we execute the closure, the closure only has access to a copy of the variable’s value - not a reference to the variable itself. So, any changes made to money outside of the closure will not affect the value of money the closure operates on.

In Bullets
  • Closures are reference types: They capture and maintain a reference to variables from their surrounding context.

  • Effect of Closures: Modifications within a closure affect the original variables outside the closure.

  • Capture List: Use variable in a closure to capture a read-only copy of the variable, preventing modifications outside the closure from affecting it.